(1)")
Your refrigerator stopped making ice, and now you’re staring at an empty bin wondering where to even start. This guide walks you through the most common causes and fixes, from the quick checks you can do in five minutes to the situations where calling a pro makes more sense.Ice makers are one of those appliances that work quietly in the background until they don’t. When they quit, it’s rarely a dramatic failure – more often it’s something sneaky, like a water valve that drifted closed or a fill tube that froze solid overnight. In Vancouver, where older homes make up a big chunk of the housing stock, we see a fair number of refrigerators that have been running for ten or fifteen years with minimal attention. At Vancouver Appliance Service Pros, we get calls about ice maker problems regularly, and the good news is that a surprising number of them turn out to be simple. That said, “simple” doesn’t always mean “obvious.” The troubleshooting process takes a little patience. Work through it step by step and you’ll usually land on the answer.
Key takeaways
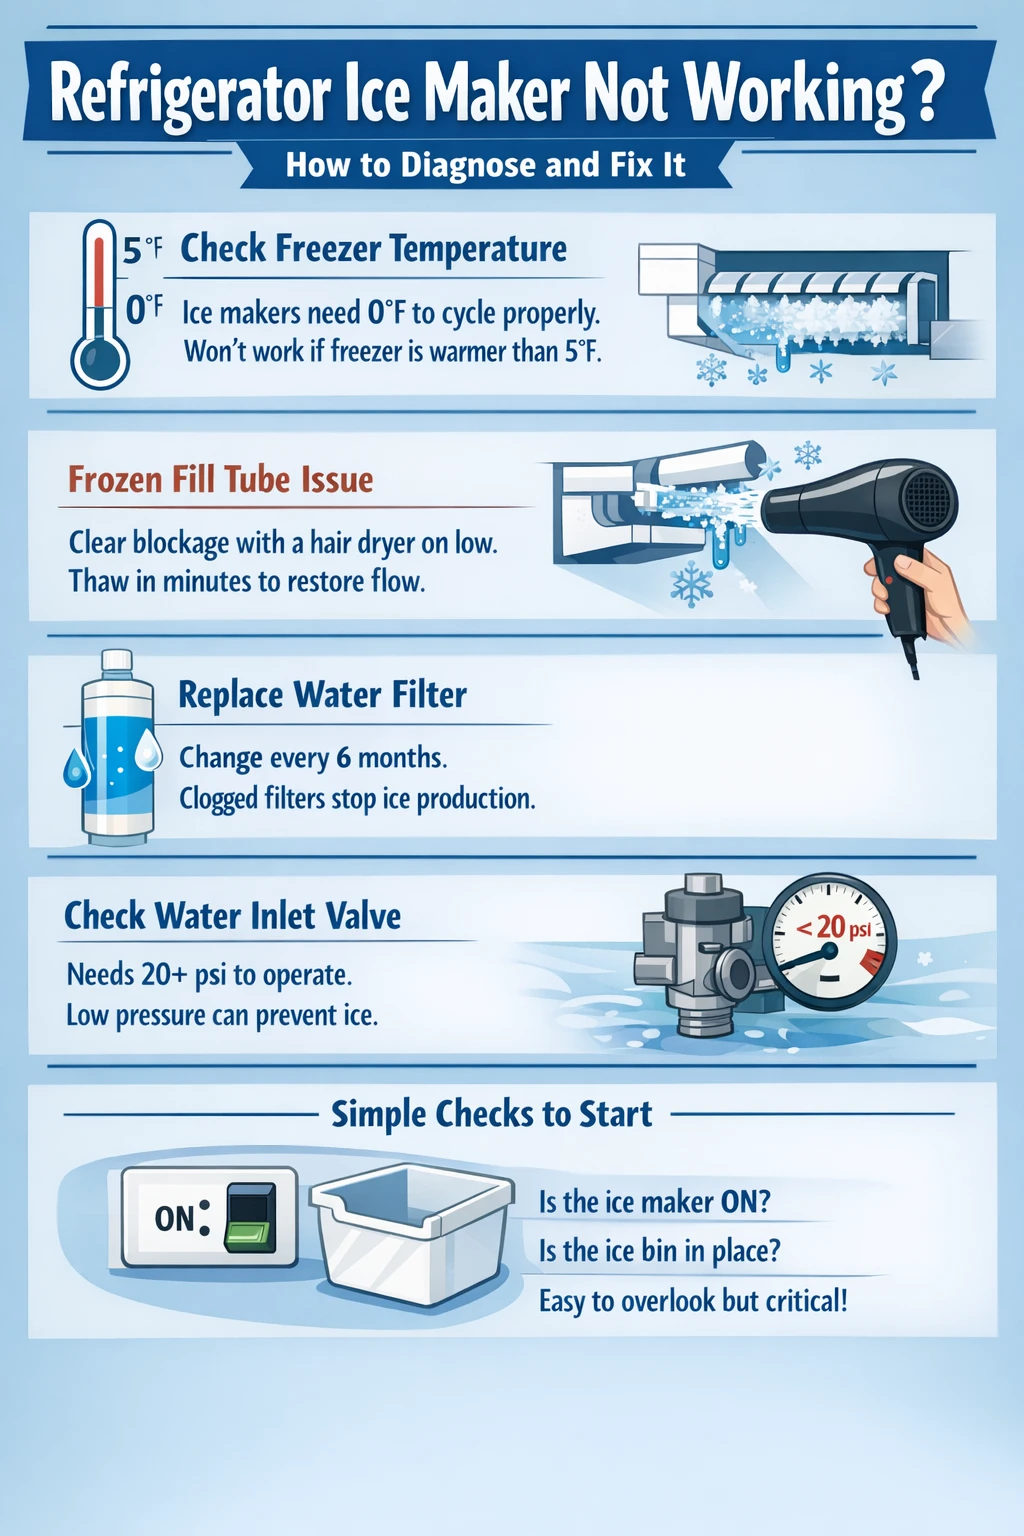
- Freezer temperature is the first thing to check – the ice maker won’t cycle properly if the freezer is warmer than 5°F, and the ideal setting is 0°F (-18°C).
- A frozen fill tube is the single most common cause of an ice maker that runs but produces nothing; a hair dryer on a low setting can clear it in minutes.
- Replace your refrigerator’s water filter every six months – a clogged filter reduces water pressure enough to stop ice production entirely.
- Water inlet valves need at least 20 psi of water pressure to open properly; anything below that and the ice maker starves for water even if the dispenser seems fine.
- Before assuming the ice maker itself is broken, check that the shutoff arm is in the down position and that the ice bin is fully seated – these account for a lot of “mystery” failures.
- Ice maker replacement parts typically run between $50 and $200 depending on the model, which often makes repair worthwhile before considering full appliance replacement.
Why your ice maker stopped making ice
Most refrigerator ice makers fail for one of five reasons: wrong temperature, no water supply, a frozen fill tube, a clogged filter, or a mechanical problem with the ice maker unit itself. That’s actually good news, because it narrows things down. An appliance tech who’s done hundreds of these will tell you that roughly 95 out of 100 “ice maker not working” calls trace back to those core categories – and most of them don’t require pulling the refrigerator apart.The ice maker works on a simple loop. A timer opens a water valve, water fills a mold, a thermostat confirms the water froze, a heating element loosens the cubes, and a small motor pushes them into the bin. A shutoff arm senses when the bin is full and pauses the whole cycle. Every one of those steps is a potential failure point, but they’re all logical. If you can figure out where in the loop things went wrong, the fix usually follows.Start with the obvious before you go digging around. Is the ice maker actually turned on? It sounds almost insulting to ask, but a lot of models have a physical switch or lever that’s easy to bump into the off position. Check it. Is the ice bin fully seated? Some refrigerators won’t start the fill cycle unless the bin is locked into place properly. These aren’t the exciting answers, but they’re the right place to begin.
Check the temperature first
Temperature is where we always start. The ice maker has a built-in thermostat that won’t trigger the harvest cycle until it confirms the water in the mold has actually frozen. If the freezer is running too warm – say, 15 or 20 degrees Fahrenheit instead of the target 0°F – the ice maker will just sit there waiting. It’s not broken. It’s following instructions.Set your freezer to 0°F (-18°C) and your refrigerator compartment somewhere in the 33-40°F range. Give it 24 hours before you draw any conclusions. Temperatures fluctuate when doors open and close, and the appliance needs time to stabilize. A technician checking a Whirlpool unit recently found the freezer only reaching 20°F and just a quarter of the evaporator coils showing frost – that turned out to be a sealed system issue, not an ice maker problem at all. The point is, temperature can be misleading if you don’t give it time to settle.On the other end of the spectrum, a freezer set below -10°F can cause its own problems. Ice cubes freeze too fast on the outside, which tricks the thermostat into ejecting them before the center solidifies. You end up with small, hollow, or misshapen cubes. The fix is the same: get back to 0°F and leave it there.
The frozen fill tube problem
Here’s the one that catches people off guard. The fill tube is a small plastic tube that delivers water from the supply line into the ice mold. It runs through or near the freezer wall, which means it’s constantly exposed to cold air. If conditions are right – or wrong, depending on how you look at it – that tube freezes solid and no water gets through.The clue is this: your water dispenser still works fine, but the ice maker produces nothing. Water is making it to the fridge. It’s just not making it through that last stretch of tubing into the mold. Someone dealing with exactly this issue described the fix perfectly – pull out the ice tray, defrost the tube with a hair dryer for a minute or so (use a low heat setting to avoid damaging plastic components), then run a few water dispenser cycles to flush out any remaining blockage. That’s it.You can also try squeezing the fill tube with your fingers if it’s accessible and made of flexible plastic. Sometimes you can feel and hear the ice crunch as the blockage breaks up. For French door models, turning the ice maker off for 24 hours sometimes lets the tube thaw on its own without any intervention. If the tube keeps refreezing after you clear it, that’s a sign of an underlying issue – possibly a problem with the refrigerator’s temperature management – and it’s worth having someone take a closer look.
Locating the fill tube
On most models, the fill tube sits toward the back of the ice maker compartment, above and behind the ice mold. To get at it, you’ll typically need to remove the front cover of the ice maker and pull the unit forward. Different brands handle this differently – some use a flat tab on the side that you press with a screwdriver, others use a connector you have to release before the unit slides out. If you’re not sure about your specific model, the manufacturer’s support page or a YouTube search for your model number will usually turn up a clear walkthrough. Whirlpool’s ice maker troubleshooting documentation is one place to start for Whirlpool and affiliated brands.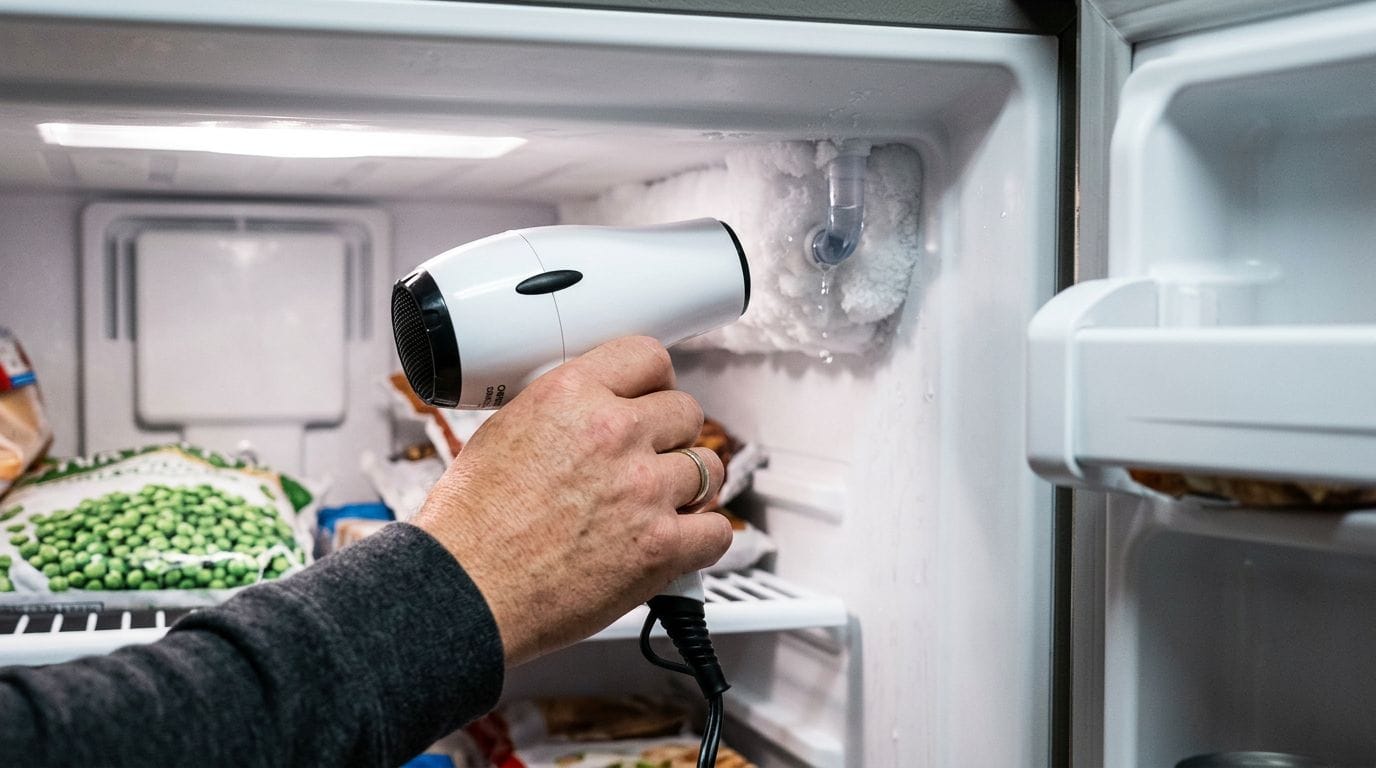
Water supply issues you might be overlooking
One of the more frustrating ice maker stories we hear goes like this: someone calls a plumber for an unrelated job – installing a dishwasher, fixing a garbage disposal – and afterward the ice maker stops working. Turned out the plumber shut off the water line to the ice maker and never turned it back on. The homeowner assumed the ice maker had failed and went out and bought a new refrigerator. The old one was perfectly fine.Check the shutoff valve behind the refrigerator before you do anything else. It’s usually a small valve on the wall or under the sink. Make sure it’s fully open. Then check the water line itself for kinks – if someone pushed the fridge too far back against the wall, the line can crimp enough to restrict flow significantly.Water inlet valves are another common failure point. The valve needs at least 20 psi of water pressure to open properly and allow water into the ice maker. If the pressure drops below that – either because of a supply issue or because the valve itself is wearing out – the ice maker gets starved for water. A valve that’s failing mechanically might also stick open slightly, which causes overfilling and ice jams. If you’ve ruled out everything else and the dispenser works fine but the ice maker still won’t fill, the inlet valve is a strong candidate. Replacing it is a moderate DIY job on most refrigerators, though getting to it typically means pulling the fridge out and disconnecting the water supply first.In parts of Vancouver where older plumbing is more common – we see this around areas like East Van and Grandview-Woodland – sediment in the water supply can also partially block the screen inside the inlet valve. Cleaning or replacing that screen sometimes solves the problem without a full valve replacement.
Water filter and water quality
The water filter recommendation is every six months, and it’s not just manufacturer boilerplate. A clogged filter genuinely does reduce water pressure enough to slow or stop ice production. When sediment builds up in the filter, it restricts the flow of water getting to the ice maker. You might also notice slower water dispenser flow, odd-tasting water or ice, or small black specks – all signs the filter is past its useful life.If you recently replaced the filter and the ice maker stopped working right after, check that the new filter is seated properly. An improperly installed filter can reduce water flow just as badly as a clogged one. A quick test: remove the filter from the housing and try to dispense some water. If water flows without the filter in place, the filter installation is the issue. Reinstall it carefully, making sure it locks into position and creates a proper seal.Vancouver’s water supply is generally soft and clean by Canadian standards, but that doesn’t mean the filter is optional. Sediment and chlorine byproducts still accumulate over time, and they affect both ice quality and the lifespan of the water inlet valve.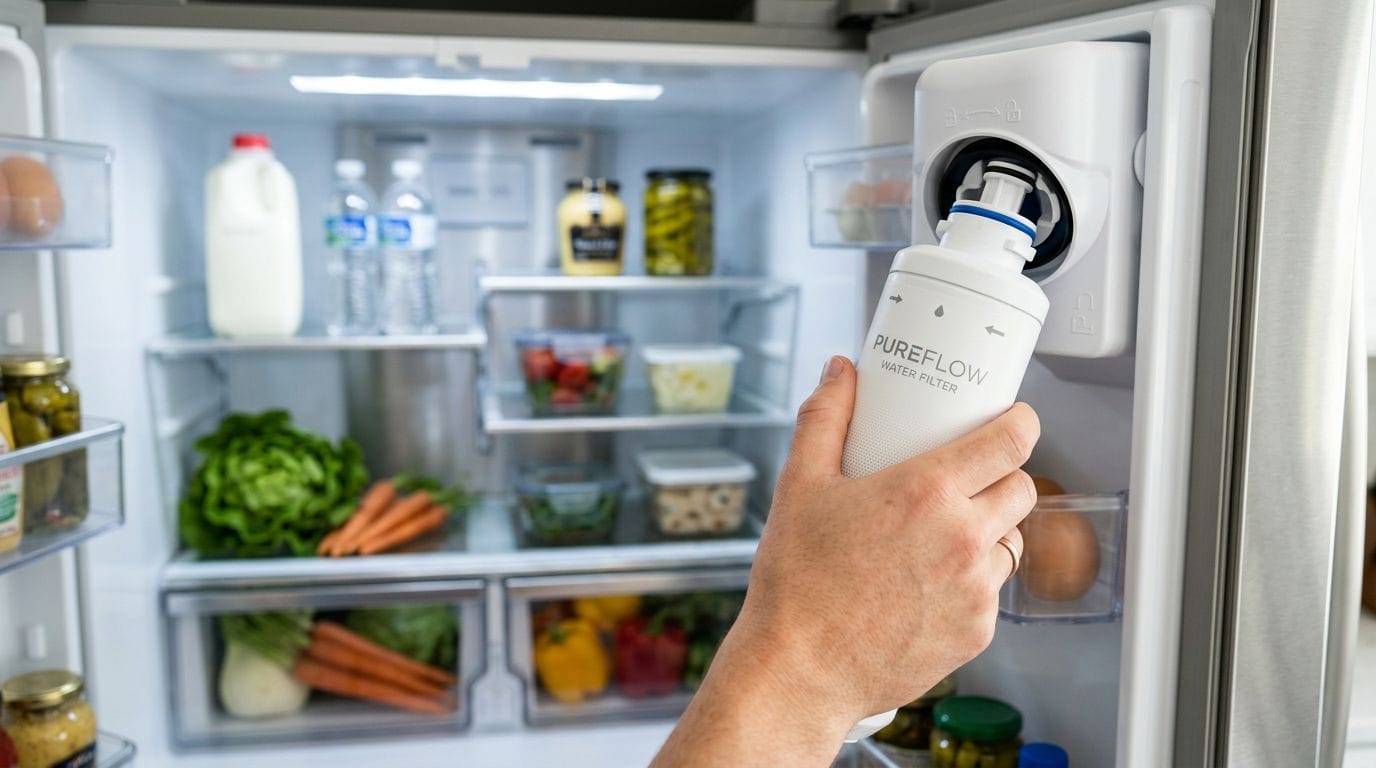
When the ice maker itself is broken
If you’ve worked through everything above – temperature is right, water supply is good, filter is fresh, fill tube is clear – and the ice maker still won’t cycle, the problem is probably in the ice maker unit itself. The timer motor, thermostat, or control board within the unit may have failed.One quick test used by appliance techs involves jumping two test points on the ice maker’s control board (usually labeled T and H) while the freezer door switch is held closed. This manually triggers a harvest cycle. If the motor runs and the arms move through the cycle, the ice maker mechanism is functional and the problem is elsewhere – possibly the control board not sending the right signal. If nothing moves, the ice maker module has likely failed and needs replacement.Don’t skip straight to an expensive control board replacement before testing the ice maker itself first. The module is almost always the more likely culprit. Boards do fail, and you can check if the board is sending power to the ice maker with a multimeter set to AC voltage at the L and N terminals, but in our experience the ice maker module is the problem far more often than the board.Ice maker modules for most common brands are available online and through appliance parts suppliers. Depending on the model, they run anywhere from $50 to $200. Installation on most side-by-side and top-freezer refrigerators is a straightforward swap. French door models with in-door ice makers are more involved – those can be genuinely tricky to access, and the wiring harnesses are delicate. If your refrigerator has one of those, it might be worth calling someone who’s done a few of them.Homeowners in Burnaby and Kitsilano tend to have a mix of newer French door models and older top-freezer units, and the repair approach differs meaningfully between them. A newer French door unit under warranty is often worth a manufacturer service call. An older top-freezer with a failed ice maker module is usually a good candidate for a straightforward DIY repair or a quick service visit.For issues with the dispenser specifically rather than ice production, Frigidaire’s dispenser troubleshooting guide covers ice jams in the chute, auger alignment issues, and the built-in shutoff that kicks in after three minutes of continuous dispenser use.
Frequently asked questions
Ice maker problems generate a lot of questions, and understandably so. The systems are simple in principle but can behave in confusing ways when something goes wrong. Here are the questions we hear most often.
Why does my water dispenser work but the ice maker doesn’t?
The water dispenser and the ice maker draw from the same supply line, but after that point they’re separate systems. If your dispenser works, you know water is reaching the refrigerator, but that doesn’t rule out a frozen fill tube, a failed ice maker module, a temperature problem, or a shutoff arm in the wrong position. Run through the other checks – temperature, fill tube, ice maker switch, bin position – before assuming the ice maker unit itself has failed.
How long does it take for a refrigerator ice maker to start making ice?
On a newly installed refrigerator, the ice maker needs the freezer to reach operating temperature before it starts, which takes several hours. After that initial cooldown, the first ice production can take up to 24 hours. Air trapped in new plumbing lines can cause the first two or three fill cycles to come up empty, and those initial batches of ice may taste off or look discolored. This is normal. Flush the water system by running the dispenser for a few minutes and discard the first batch of ice.If a previously working ice maker stops and you reset it, give it a few hours before deciding whether the fix worked. The cycle from fill to harvest takes time, and impatience leads to unnecessary parts replacements.
Is it worth repairing an ice maker or should I just replace the refrigerator?
In most cases, repair is the right call unless the refrigerator is already very old or has multiple problems. An ice maker module replacement typically costs between $50 and $200 for parts, plus labor if you hire someone. A new refrigerator with an ice maker starts at several hundred dollars and goes up from there. The math usually favors repair unless the appliance is more than 10-12 years old and other components are also showing wear.That said, some sealed system problems (compressor, refrigerant issues) that affect ice production are expensive to fix and may not be worth the cost on an older unit. A qualified technician can usually tell you within the first visit whether a repair is economically sensible. Ask them to explain the diagnosis and the cost before agreeing to any work.
Why does my ice taste strange even after replacing the filter?
Old ice absorbs odors from food in the freezer, especially poorly wrapped items. After replacing the filter, dump the existing ice and let the ice maker produce a fresh batch. If the new ice still tastes off, check that frozen food near the ice bin is properly wrapped. Ice that sits in the bin for weeks without being used also tends to go stale – regular use keeps the supply fresh. If the taste problem persists despite fresh ice and a new filter, the non-stick coating inside the ice mold may be deteriorating, which is a sign the ice maker module needs replacement.
What does it mean when I hear the ice maker cycling but no ice comes out?
The ice maker is going through its cycle, but something is preventing ice from forming or being ejected. The most likely causes are a frozen fill tube (water isn’t getting into the mold), a temperature problem (the water isn’t freezing properly), or a mechanical failure in the ejector mechanism. Start with the fill tube – thaw it out and see if ice production resumes. If the unit cycles but the mold stays empty, check the water supply and inlet valve. If the mold fills but ice doesn’t eject, the harvest mechanism may have failed.
Wrapping up
Most ice maker problems come down to a handful of things: freezer temperature out of range, a water supply issue, a frozen fill tube, or a worn-out filter. Work through those checks systematically before assuming you need a new ice maker or a new refrigerator. The fix is often simpler than it looks, and patience during the diagnostic process saves a lot of unnecessary expense. If you’ve run through all of this and still can’t pin down the problem, or if the repair involves components you’re not comfortable working on, that’s a reasonable point to bring in help.At Vancouver Appliance Service Pros, we handle fridge repair and ice maker troubleshooting across Vancouver and the surrounding area. Whether it’s a fill tube that keeps refreezing or a module replacement you’d rather not tackle yourself, give us a call and we’ll help you figure out the most practical path forward.